But what if I told you it came with unlimited baskets of kittens and a unicorn docking station?
Friday, May 22, 2015
Thursday, August 15, 2013
Can we be done with skinny jeans already?
I just bought these jeans. They are flattering! They are cute! They are comfortable!
They are NOT skinny.
Join me!!
Seriously, folks. I have to tell you. The ones of you who are not 5'10-yet-size-2 (i.e. myself and everyone I know): your skinny jeans? They're not so flattering. They look weird with shoes. And the worst offense: they have trickled into menswear. THAT is a nightmare.
I don't think we should all be purchasing big old Woodstock wide-flare bell bottoms. Just something that's a bit more universally flattering. You WANT to look like this?
Do you?
DO YOU??
Look. If you want to resemble a Weeble, keep drinking the retail Kool-Aid that has you convinced that you look cuter than the Biebs here. Keep some semi-skinny jeans for tucking into tall boots in the wintertime, I'm cool with that. But remember how long it took you to jump on the skinny jean bandwagon in the first place? There's a reason for that.
They are NOT skinny.
Join me!!
![]() |
| Gap 1969 Perfect Boot Jeans |
I don't think we should all be purchasing big old Woodstock wide-flare bell bottoms. Just something that's a bit more universally flattering. You WANT to look like this?
![]() |
| www.gofugyourself.com |
Do you?
DO YOU??
Look. If you want to resemble a Weeble, keep drinking the retail Kool-Aid that has you convinced that you look cuter than the Biebs here. Keep some semi-skinny jeans for tucking into tall boots in the wintertime, I'm cool with that. But remember how long it took you to jump on the skinny jean bandwagon in the first place? There's a reason for that.
Wednesday, June 12, 2013
How to fix a too-tight dance costume!
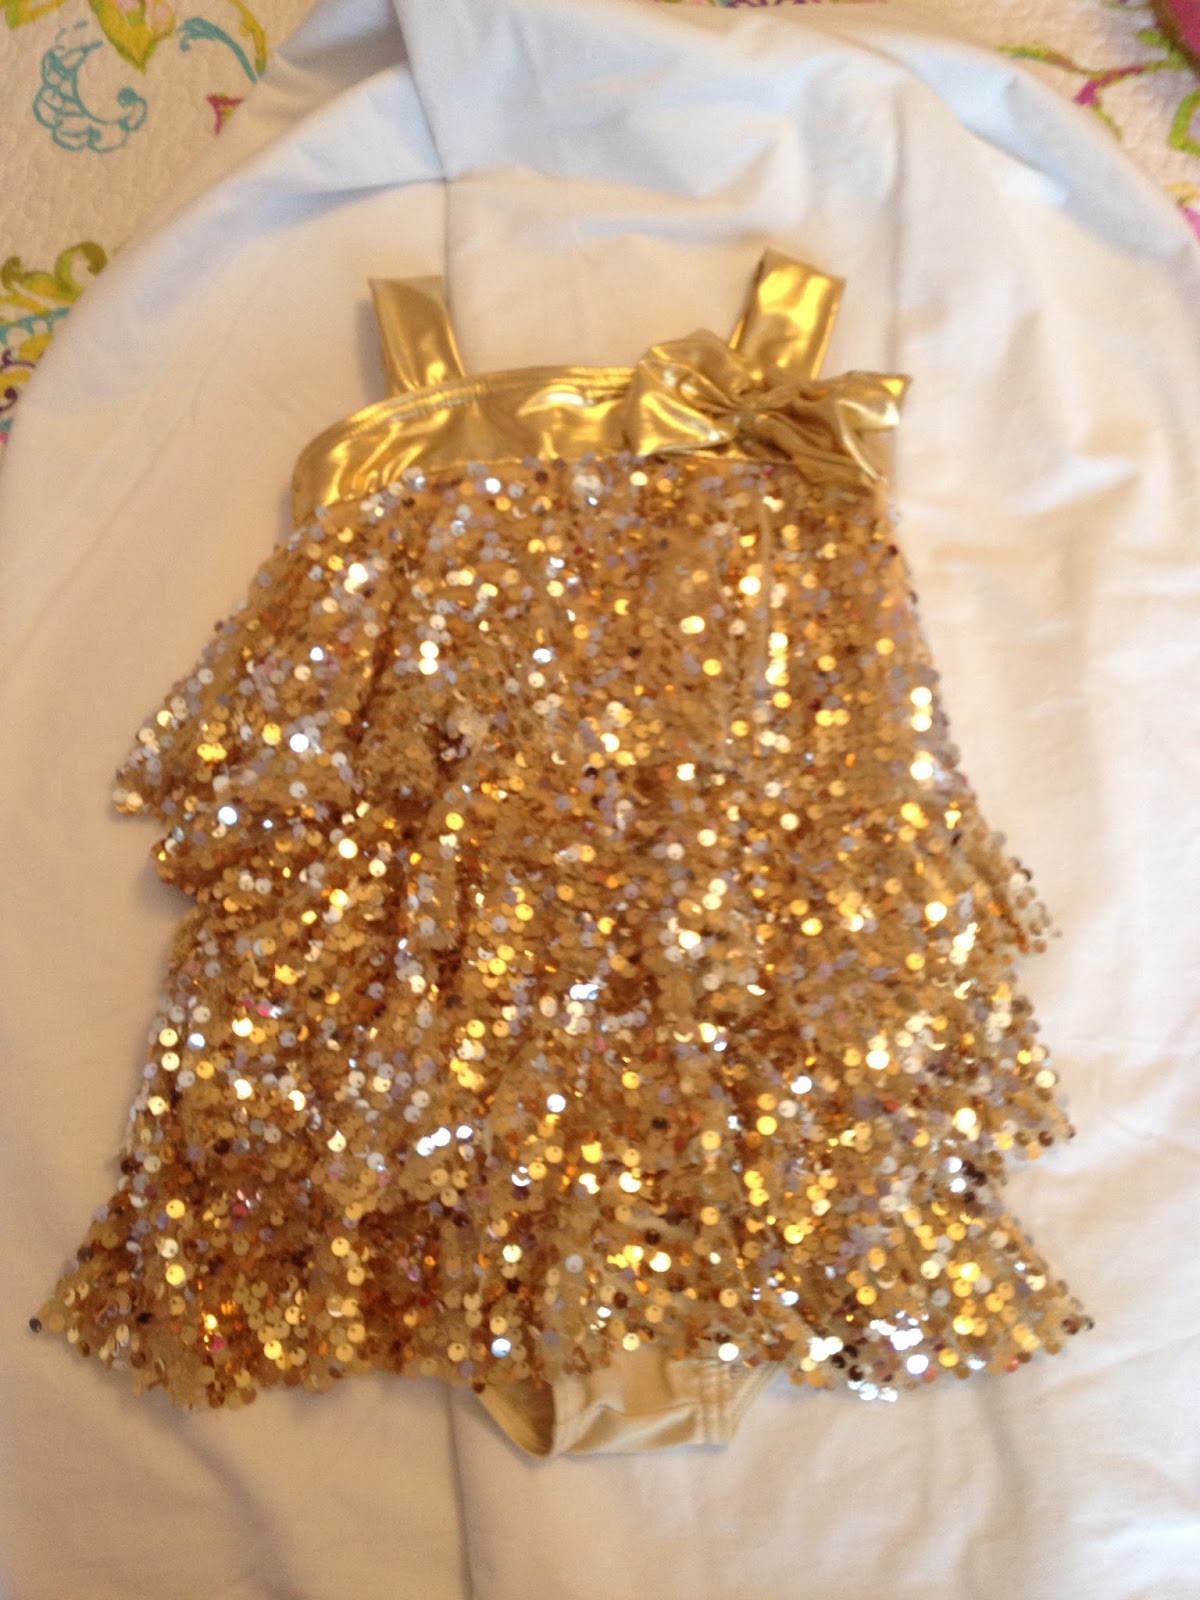
We're nearing the end of recital season, but I came across this photo from last year and wanted to share this tip which may still help out some little dancers!
One of the biggest gripes of parents of dancers is costumes. You have to order them a long time in advance, you have no idea what you're getting, you're paying a lot of money, and you don't know what the quality or fit will be like.
This super cute little preschool costume was WAY too short for my tall kid. It was not simply uncomfortable, it was painful for her to wear--and she could barely get it on in the first place!
The dance teacher asked if I could just cut the crotch and insert a piece of fabric. That would be a bad fix, because then you'd be working with a tricky elasticized area AND you'd be making the leg holes too big besides. You can lengthen a dance costume in a much more effective way, provided there's an area of torso that will be concealed by the skirt or tutu.
Take a peek underneath. I sliced the leotard horizontally. Then I cut a strip of lycra fabric (ask for "swimwear"fabrics at the fabric store--they're very pricy but you only need a tiny bit) to insert.
I wanted to add 2 1/2" to the length (it was THAT short) so I cut my fabric strip 3" wide to allow for a 1/4" seam allowance. Length for your strip, of course, is going to be twice the width of the leotard plus 1/2" if you use a 1/4" seam allowance to make it a continuous loop. Then all you have to do is sew the pieces back together. I have a serger, which is what you really need for sewing with lycra. But since this is a one-time-wear costume and the fix is going to be totally concealed, why not try it on a regular sewing machine? Try a zigzag stitch so it'll stretch just a bit--it won't lie flat but that's okay because you'll never see it.
One of the biggest gripes of parents of dancers is costumes. You have to order them a long time in advance, you have no idea what you're getting, you're paying a lot of money, and you don't know what the quality or fit will be like.
This super cute little preschool costume was WAY too short for my tall kid. It was not simply uncomfortable, it was painful for her to wear--and she could barely get it on in the first place!
The dance teacher asked if I could just cut the crotch and insert a piece of fabric. That would be a bad fix, because then you'd be working with a tricky elasticized area AND you'd be making the leg holes too big besides. You can lengthen a dance costume in a much more effective way, provided there's an area of torso that will be concealed by the skirt or tutu.
Take a peek underneath. I sliced the leotard horizontally. Then I cut a strip of lycra fabric (ask for "swimwear"fabrics at the fabric store--they're very pricy but you only need a tiny bit) to insert.
I wanted to add 2 1/2" to the length (it was THAT short) so I cut my fabric strip 3" wide to allow for a 1/4" seam allowance. Length for your strip, of course, is going to be twice the width of the leotard plus 1/2" if you use a 1/4" seam allowance to make it a continuous loop. Then all you have to do is sew the pieces back together. I have a serger, which is what you really need for sewing with lycra. But since this is a one-time-wear costume and the fix is going to be totally concealed, why not try it on a regular sewing machine? Try a zigzag stitch so it'll stretch just a bit--it won't lie flat but that's okay because you'll never see it.
Voila! A MUCH more comfortable costume.
Different costume, same story:
![]() |
| Happy little dancer. |
Friday, February 22, 2013
Quickie embellished tee!
I always feel like something's missing when my girls put on a plain t-shirt. There may come a time when they don't want to dress in sparkles from head to toe, so I feel like I need to carpe diem when it comes to sequins and bows.
The t-shirt was $1.50 on the Target clearance rack. At that price I can afford to trash it if I accidentally destroy the shirt in the embellishment process.
To sew on the sequins, you can pin the string down in a random pattern like I did, or try to make a certain shape or even a letter or word. Set a wide zig-zag stitch and just sew down the whole length. Try not to stretch the shirt out of shape when you're going horizontally!
I like to stick these bows on everything. Make your bow and manipulate it so that the right side faces up on every part of the bow. Turn the raw ends under 1/4" and pin the whole thing, squashed flat, to the shirt. Use a regular straight stitch and sew down all the edges, making sure to sew all the way through the knot at some point. This way that bow will always look like that and will never come untied!
Bring all thread ends to the inside and tie off. You may need to sew a few stitches over the ends of the sequins to make sure they won't start unraveling. This should take less than an hour. Less than half an hour if you don't have Dr. Phil on in the background. When it's time to launder it, simply turn it inside out and throw it in the washer!
The t-shirt was $1.50 on the Target clearance rack. At that price I can afford to trash it if I accidentally destroy the shirt in the embellishment process.
![]() |
| Quick and easy embellished tee! |
I like to stick these bows on everything. Make your bow and manipulate it so that the right side faces up on every part of the bow. Turn the raw ends under 1/4" and pin the whole thing, squashed flat, to the shirt. Use a regular straight stitch and sew down all the edges, making sure to sew all the way through the knot at some point. This way that bow will always look like that and will never come untied!
Bring all thread ends to the inside and tie off. You may need to sew a few stitches over the ends of the sequins to make sure they won't start unraveling. This should take less than an hour. Less than half an hour if you don't have Dr. Phil on in the background. When it's time to launder it, simply turn it inside out and throw it in the washer!
Monday, October 1, 2012
Hermione Doll (Because girls like Harry Potter too)
Plenty of little girls love Harry Potter books...but there aren't many corresponding girl toys. My seven-year-old wanted a Hermione doll, and the only existing ones are either pricey collectibles or ugly action figures. She also wanted it to be similar to an American Girl doll, since that's the type of doll she and her friends like to play with.
Isn't she cute? To make her cardigan without having to actually knit, I purchased gray socks and made a simple sweater shape. Her blouse is a length of white blanket binding that I had on hand. I used a length of yellow ribbon for the tie--I wrapped 1/8" scarlet colored ribbon (the 50-cents-a roll-kind) around it to make the stripes, pressed it flat, and sewed the whole thing down in a tie shape.
Then I made her a black robe lined with with red satin, and a quicky crocheted Gryffindor scarf.
Sorry her hand is turned all at a wonky angle. Must be some sorta freaky wizard trick.
I found a very cute 18" doll, only $20 at Target. The brand is "BFC, Ink" and I think they're the cutest imitation-American Girl dolls I've seen. They're hinged and flexible like Barbies, but close in size to American Girl dolls.
Isn't she cute? To make her cardigan without having to actually knit, I purchased gray socks and made a simple sweater shape. Her blouse is a length of white blanket binding that I had on hand. I used a length of yellow ribbon for the tie--I wrapped 1/8" scarlet colored ribbon (the 50-cents-a roll-kind) around it to make the stripes, pressed it flat, and sewed the whole thing down in a tie shape.
Here's what it looks like from the inside.
It's a two-fer! A faux shirt/sweater combo, which means it's super easy for the kids to dress and undress the doll.
Then I made her a black robe lined with with red satin, and a quicky crocheted Gryffindor scarf.
Sorry her hand is turned all at a wonky angle. Must be some sorta freaky wizard trick.
Saturday, September 22, 2012
Vintage Pattern, Modern Style: Marlo's Dress
One pattern, two ways:
This is a great pattern, if a little complex. There are lots of pattern pieces and weird facings. It's from 1976, and one of a few Marlo Thomas patterns I've come across. Check out her illustrated toothy grin:
This was one of the first things I made post-Katrina. One box of patterns survived on a high shelf, a few more boxes were back home with my parents. I loved the Chinese lantern print, and added a red topstitch to emphasize the pattern pieces. It's a "silky print," meaning it's not actual silk, of course, but it's a slippery slinky fabric that can be tricky to deal with. It also unravels easily if the raw edges aren't finished or enclosed in a lining, so it's best to use these fabrics only if you have a serger.
When I made the Chinese lantern dress, I bought the fabric before I decided on the pattern. Later on, I wished I had used a contrasting fabric to emphasize the interesting design, as they did on View D on the pattern illustration. So I used this print with an art-deco kinda vibe, and paired it with plain black.
Lately I've been using random contrasting fabric for linings. Quilting cottons are often really pretty but are too stiff for apparel, so they make great facings. I'm the only one that sees it, but it looks so nice on the hanger.
Friday, September 14, 2012
Vintage Pattern, Modern Style
My vintage pattern collection is pretty vast, thanks to my aunts and my late, great Maw Maw. An annual charity flea market allowed shoppers to fill a large bag with patterns for just a few bucks, and Maw Maw filled a bag for me. I discovered that vintage patterns are really fun and easy to work with, and ever since that first pattern purchase in the early 1990's, my family knows to be on the lookout at estate sales, antique malls, and yard sales!
My favorite patterns are from the late 1960's--lots of cute little shift dresses and a-line minis, often with coordinating jackets. Most of these are fairly timeless and mesh very well with today's style. Some vintage garments--the wide lapels of 1970's collars, the girdle-squeezed-tiny-waist dresses of the 1950's, the linebacker shoulders of the 1980's--don't translate very well to modern fashion. Still, all patterns can be modified! Older patterns usually contain only one size so they're much easier to work with than the multi-size patterns of today (of course, this requires a bit more treasure-hunting). The tissue paper also seems to be slightly thicker and sturdier and therefore, easier to work with.
My latest project used an easy peasant style blouse pattern from 1976. You can see from the illustration that there's a good bit of that old 70's ugliness going on, but this style is pretty tame compared to most 70's patterns.
I decided on View 2 (though I really like the View 3 style as well). Against my better judgement I used the sleeve pattern even though I could tell it was a bit wonky--some of these old patterns are. The result was an unflattering sleeve with all the fullness underneath rather than at the cap (pretty much as illustrated in View 2 above, but worse). First, I tried cutting the sleeves about 3" shorter. Still ugly. Then I decided I'd just double them under and sew the hem to the armscye seam. Voila, puffy cap sleeves! Much better.
The main fabric is a stretchy, almost opaque mesh. Opaque enough to not line, anyway. The inset is brocade and the sleeves are transparent mesh. Impossible to sew on if you don't have a serger, FYI. And because my time is precious, I did a rolled hem on my serger, which looks totally fine for a casual top. In my humble opinion anyway.
It's a little loud but dark denim works well to tone it down a notch!
My favorite patterns are from the late 1960's--lots of cute little shift dresses and a-line minis, often with coordinating jackets. Most of these are fairly timeless and mesh very well with today's style. Some vintage garments--the wide lapels of 1970's collars, the girdle-squeezed-tiny-waist dresses of the 1950's, the linebacker shoulders of the 1980's--don't translate very well to modern fashion. Still, all patterns can be modified! Older patterns usually contain only one size so they're much easier to work with than the multi-size patterns of today (of course, this requires a bit more treasure-hunting). The tissue paper also seems to be slightly thicker and sturdier and therefore, easier to work with.
My latest project used an easy peasant style blouse pattern from 1976. You can see from the illustration that there's a good bit of that old 70's ugliness going on, but this style is pretty tame compared to most 70's patterns.
I decided on View 2 (though I really like the View 3 style as well). Against my better judgement I used the sleeve pattern even though I could tell it was a bit wonky--some of these old patterns are. The result was an unflattering sleeve with all the fullness underneath rather than at the cap (pretty much as illustrated in View 2 above, but worse). First, I tried cutting the sleeves about 3" shorter. Still ugly. Then I decided I'd just double them under and sew the hem to the armscye seam. Voila, puffy cap sleeves! Much better.
The main fabric is a stretchy, almost opaque mesh. Opaque enough to not line, anyway. The inset is brocade and the sleeves are transparent mesh. Impossible to sew on if you don't have a serger, FYI. And because my time is precious, I did a rolled hem on my serger, which looks totally fine for a casual top. In my humble opinion anyway.
Subscribe to:
Posts (Atom)